Always attach OneDrive "files" not "links"
We think it is important that to tell you that Microsoft Outlook 2016 includes a new "feature" that allows you to send people links to files that you have stored in OneDrive. Sending a link instead of the actual file has several benefits such as keeping the email smaller and making sure that people are always using the latest version of the file. This is a great "feature" but you may have already started sending "links" to files by accident instead of sending the files themselves in your recent emails. Unfortunately, there is no way to change the default attach behavior, so we have created the documentation below to make sure you recognize the change that has been made to Outlook so that you don't accidentally send OneDrive file "links" when you were intending to send an actual copy of the file.
If you have Microsoft Office 2016, then whenever you create an email and you click on the "Attach File" menu, you may not notice anything at first in the list of "Recent Items." However, if you are actively using OneDrive (which you should be by now) then if you should actually see some of your files will have a "cloud" on top of the file icon like the image below.

We understand that most of the time you probably want to send the file itself and not a link to the files, but unfortunately Microsoft has not given us the ability to change this new behavior. If you often use the "Recent Items" menu for attaching files, then you need to always be certain to check whether or not you are attaching an actual file or a link to the file. The following methods are simply alternative ways to attach files to your emails, but you should already be pretty familiar with most of the following methods.
 Method 1: Attach as Copy
The built-in method to convert a Cloud Attachment into an actual attachment is to attach the file as usual and then click the down arrow next to the attachment. This opens a dropdown menu from which you can choose: Attach as Copy.
After choosing this command, Outlook will download the latest version of the file from OneDrive and attach it to your email.
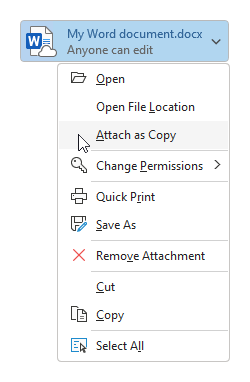
Convert a OneDrive attachment into an actual attachment.
Note: The above option is not available when using OneDrive for Business (SharePoint).
When you are composing in Plain Text format, you’ll get prompted how you want to attach the file when selecting a file that is located on OneDrive or other Cloud based storage;
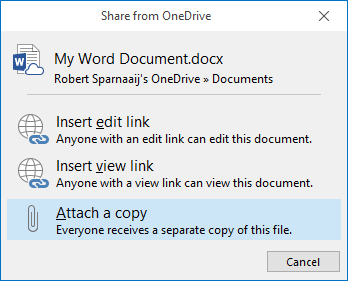
Converting a OneDrive attachment when composing in Plain Text.
 Method 2: Copy & Paste
To bypass the need to select “Attach a Copy” and download the file, you can use the Attach File method to browse to the file as you’d normally do but instead of selecting the file and pressing the Open button, select the file and press CTRL+C to copy the file. You can then press Cancel to close the Attach File dialog.
Once returned to the message, press CTRL+V to paste the file as an actual attachment to your message.
This method also works for OneDrive for Business.
 Method 3: Drag & Drop from File Explorer
Yet another way to include actual attachments instead of OneDrive links is to attach the file via Drag & Drop from a File Explorer window.
This might sound complicated, but it is actually quite easy.
Create and type your email as you’d normally do until you are ready to add an attachment.
Open a File Explorer window (keyboard shortcut: Windows key + E).
Browse to the file that you want to attach.
Click and hold down your mouse button on the file.
Move your mouse cursor within the message body of the email that you are creating and release the mouse button; The file will now show up as an actual attachment.
I use this method quite a lot as attaching a file via the regular method basically does nothing more than opening a smaller File Explorer window and I often already have a File Explorer window open at the file’s location when I just finished editing the file that I want to send.

Attaching files via the drag & drop method will always create actual attachments even when you are dragging from a OneDrive folder.
 Method 4: Use the classic Attach File button
As the first method is relatively slow (especially when attaching multiple files) and the drag & drop method might not be as convenient for everyone, there is also a way to bring back the “classic” Attach File button that isn’t “Cloud aware” at all.
When you use this Attach File button, you will always add the file as an actual attachment and never as a link to OneDrive or any other Cloud based storage.
You can add the command to the Quick Access Toolbar in the following way;
File-> Options-> Quick Access Toolbar
Set the “Choose commands from” dropdown list to: All Commands.
Select the “Attach File” command.
Make sure you do not select the “Attach File…” command as that is the new menu button.
Press the “Add > > “ button.
Press OK to close the Options dialog and return to Outlook.
When you also want to add this command to the QAT of the Message Compose window or the Appointment/Meeting window, then create a new message or Calendar item and repeat step 1 to 5.
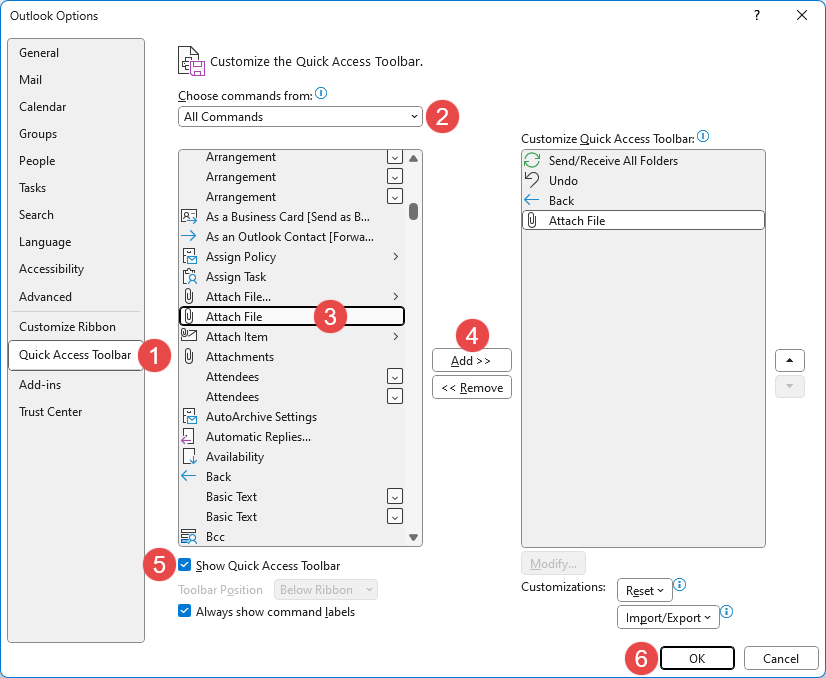
Adding the classic Attach File command to the QAT. (click on image to enlarge)
You can add the classic Attach File button to the Ribbon as well. You must then choose “Customize Ribbon” in the Options dialog and create a new Group first before you can add the command to the Ribbon tab of your choice.
For detailed instructions see: Adding commands to the Home or Message tab of the Ribbon.
 Change in behavior?
If you have been using Outlook 2016 for a while now, you may have noticed there was a chance in behavior since the July 26, 2016 update (version: 16.0.7070.2033).
Before this update, you could use the “Browse this PC…” command to always insert a file as an actual attachment instead of a web link to OneDrive even when the file was located within your local OneDrive folder.
After this update, Outlook is “clever” enough to recognize the OneDrive folder and still treat the file as a cloud attachment.
What do you think? Should they bring back this behavior or should they otherwise make it easier/faster to include files stored in OneDrive as actual attachments?
You can make your voice heard on Outlook’s official UserVoice page!
You can for instance upvote the already existing suggestion; Option of “Attach as Copy” to be set as default option when attaching file to an email in Microsoft Outlook 2016.